Native screen recording was introduced in Android 4.4, but hasn’t been mentioned much since first announced. Still, it can be pretty handy if you want to show someone what it is you’re talking about. For me, screen recording is screen shot 2.0 and an invaluable tool for creating guides and showing friends and family how to do something when I get the, “How do I do this,” call.
By using the Android Debug Bridge (adb) command screenrecord, you can start a video capture of what you are doing and save it locally to your device storage in mp4 format. From there, you can upload it to YouTube, share to Google+, or pretty much anything else you want to do with it.
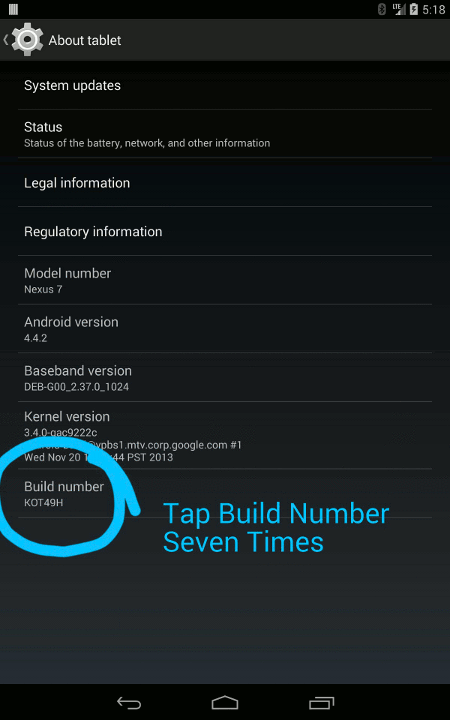
To get started, you will first need to enable adb on your device. If you have never enabled this before, go into the settings sub-menu About Phone first and tap on the Build number seven times. When you back out into the settings menu again, Developer options will be there. Set Developer options to on and check USB debugging to enable it. Ironically, I couldn’t show you a screen recording showing you how to enable adb, so enjoy this GIF made of from screen shots instead.
Next, you need a working adb environment on your computer. You can get this from developer.android.com and follow the instructions there to install the full Android SDK, or hit this 15 second adb installer featured on XDA. Once you have adb setup, plug in your device’s micro-USB cable, let the drivers install, and test that it recognized your device by opening a command window and entering:
adb devices
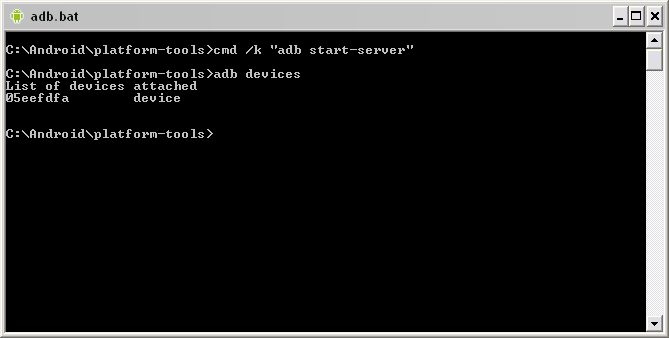
If this returned your serial number, then you are ready to go. If not, driver issues or missing the security pop-up on your device to accept adb connections are the top two reasons.
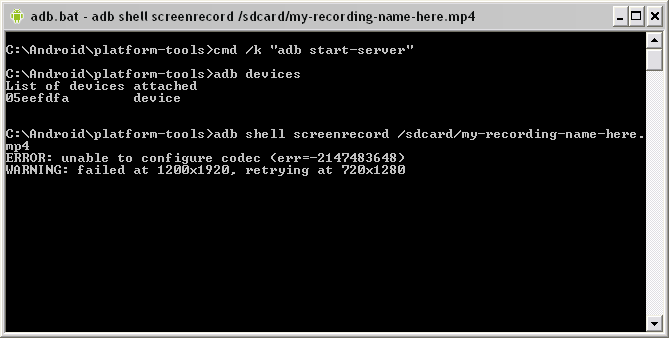
Once you are sorted, let’s make a recording. The command will be adb shell screenrecord, followed by options, and then the location and name you want to save the file. Devices with high-resolution screens may throw an error but it does start the recording. This is normal and reverts to the highest resolution the AVC encoder can handle. You can always add a –size option if desired to get rid of the error or tweak the bit rate.
Options:
–size WIDTHxHEIGHT
Set the video size, e.g. “1280×720”. Default is the device’s main
display resolution (if supported), 1280×720 if not. For best results,
use a size supported by the AVC encoder.
–bit-rate RATE
Set the video bit rate, in megabits per second. Default 4Mbps.
–time-limit TIME
Set the maximum recording time, in seconds. Default / maximum is 180.
–rotate
Rotate the output 90 degrees.
–verbose
Display interesting information on stdout.
–help
For our example, to enter adb shell screenrecord command in your terminal window, sized to 720×1280 resolution and saved to the sdcard as my-recording-name-here.mp4:
adb shell screenrecord –size 720×1280 /sdcard/my-recording-name-here.mp4
After you enter the command, do whatever it is you want to capture. Recording continues until Ctrl-C is hit or the 3 minute time limit is reached.
When done, browse to the folder the video is saved on your device and see what you have. If you need to remove the beginning or end of the video, some devices include a built-in editor or you can download one from Google Play. YouTube and Google+ Photos also has some limited editing tools. Any serious editing and you’ll want to copy the file to your computer. Unfortunately, there is no sound captured but you can add audio later in editing if desired.
That is all you need to capture a screen recording on Android 4.4! If you found this helpful or have any pointers, let us know in the comments!
Image Credits: Android Fan Network
About Kevin Krueger
Self-proclaimed "know-it-none," I prefer HTC hardware with AOSP ROM's. When not writing about technology or shooting YouTube videos, I like to tinker with motorcycles and R/C cars.
- Web |
- Google+ |
- More Posts (105)